The MIDI Keyboard
Tap on the little keyboard icon on the bottom to show the keyboard' you can use it to play the internal Synth or the RAU (i e Remote Audio Units) instrument you load in the nodes
Use the handle area to the top of the keyboard window to drag it up or down
Tap the keyboard icon checkbox on the top to enable/disable MIDI communication with the RAU (i e Remote Audio Units) instruments
Tap on the padlock to activate the “sustain mode” In “sustain mode” when you tap a key it will remain on until you tap it again
The “+” and circular icons in the tiny keyboard are used to increase/ decrease the number of keys visible in the keyboard
The “panic” triangle generates all notes oft
The amplitude of each note i e its key velocity (O + 127), changes in relation to the vertical position of the tapping
The Aftertouch Y Scrub, can be assigned to one or more parameters, see the Control Manager Tap and hold a note, then scrub along the vertical axis (Y) to control the assigned parameters
The Ribbon (First icon on the left) performs a continuous theremin-like pitch/amp glissando The Ribbon will not afiect the RAU instruments which remain quantized over the semitone grid
You can play through a remote MIDI keyboard and use the Virtual Keyboard at the same time, for instance, to play the Ribbon
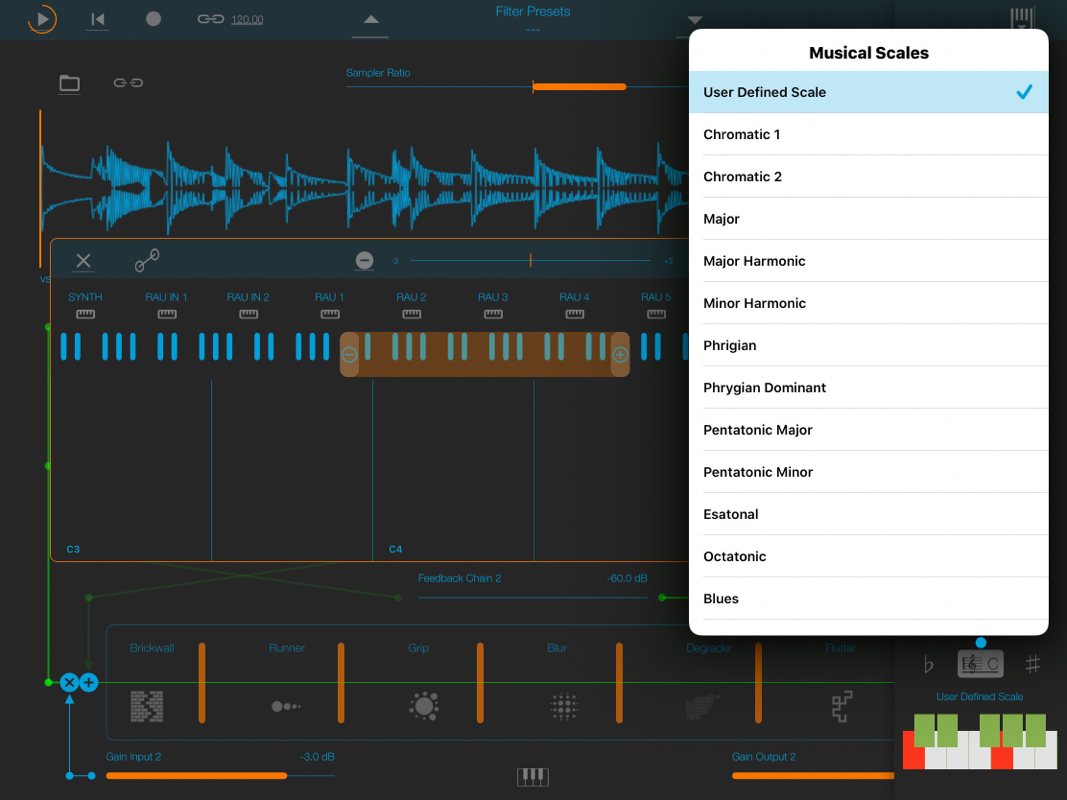
The b and # transposition keys allow to change the base note of the keyboard (C) and the Scale button opens a menu where you can choose among several scales. The first item on the list (User Defined Scale) is a special feature which allows you to setup your own scale through the Musical Keyboard.
N.B. The transposition keys don't affect incoming MIDI notes.
N.B. The transposition keys don't affect incoming MIDI notes.
The Sampler
You can feed Moebius with a stereo sampler or stereo signal from microphone/line or Audiobus/Inter-App Audio when connected
Touch and drag the waveform to scrub the audio file The speed of the scrubbing is relative to the position of the finger inside the waveform- higher positions produce faster scrubbing
The Sampler state saved in the presets, is composed by File Path, Loop Points (Zoom), Play/Pause and selected Input Source
Tap the first symbol on the right to set the loop points When in "loop edit mode" you can
- tap and hold inside the selection for the fine regulation of the loop
- double tap inside the selection to select again the whole file
When a loop is set, deselect the (tap again) to zoom-in into the loop selection
Waveform Scrubbing Mode (second symbol on the right) , when selected the pointer jumps to the Absolute
position of the finger that touches the waveform If unselected (Relative) it does not jump but the scrubbing occurs from Sampler position toward finger touch
Switches the Sampler Play function between Ratio and Time Signature
(Second symbol on the left) mode When in Ratio mode (blue icon) you can set the play ratio" 1 means play the sound file at the original speed, 0 5 means play at half speed, -0 5 means play at half speed and in reverse and so on When in Time Signature mode (orange icon) you specify the number of Measures and Quarter per
Measure the sound file contains, and the tempo is linked to the general
Metronome Tempo; for instance if we specify 2 measures of 4 quarters each, and the general Tempo is 120 BPM, the sound file will be executed in 4 seconds
<- BPM The button appears only when the Sampler is in Time Signature mode (see above) If you tap the <-BPM button you ovenivrite the general Metronome Tempo with a tempo calculated using the sound file length and the Measures/Quartes setting For instance, if the sound file length is 2 seconds, and it has 2 measures of 4 quartes each, the general Tempo is set to 240 bpm This function is not available when the General Metronome is in SYNC mode (MIDI Clock or Ableton Link)
N.B. You can disable the Crossfade and change Waveform style from the Settings. See the Settings for more details
Load (Folder) an audio sample
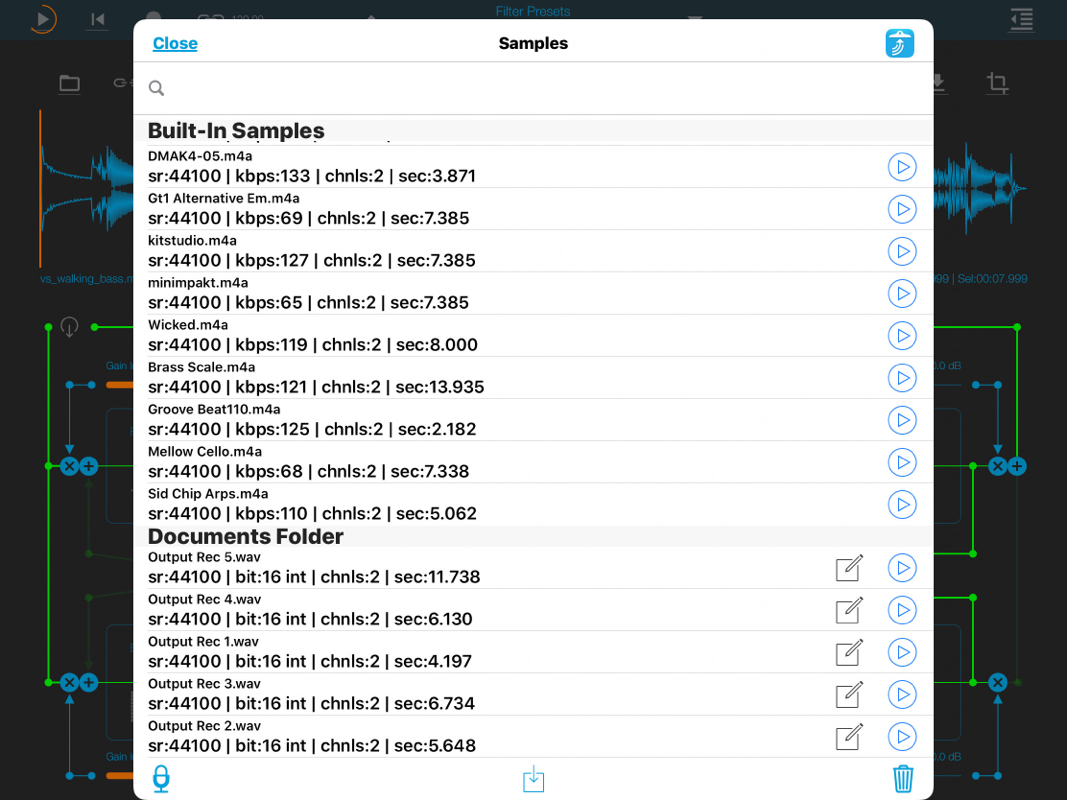
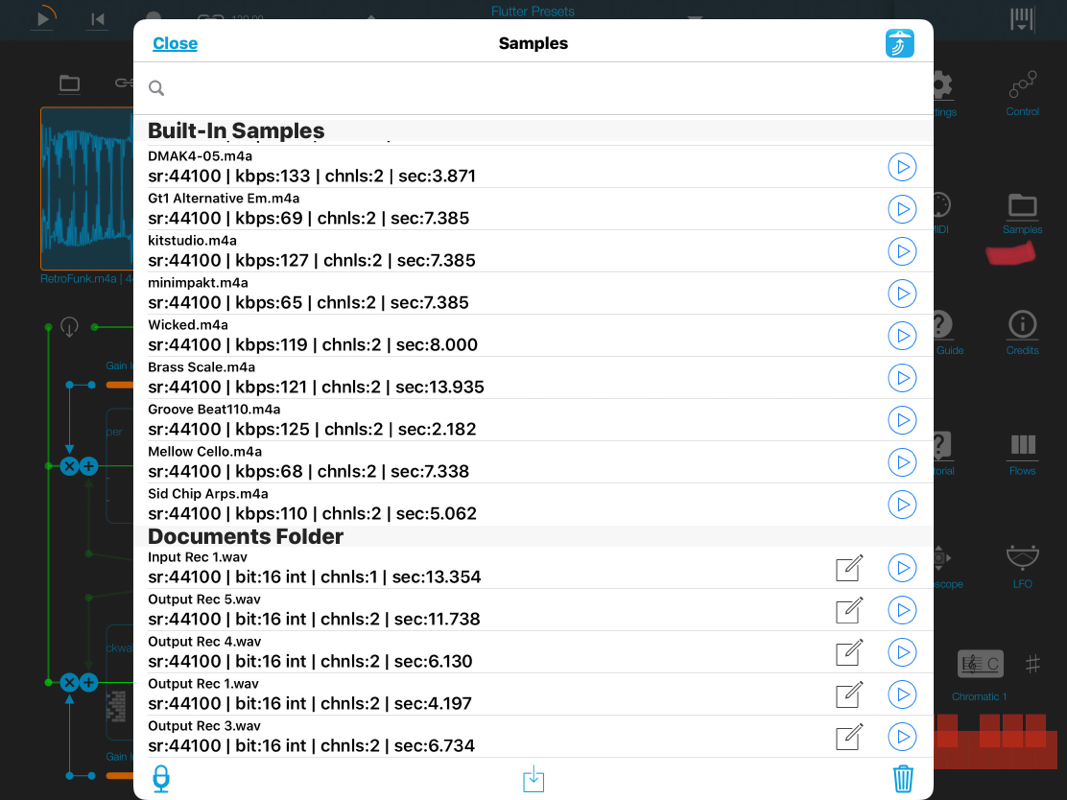
The Samples Manager can read/write in the Documents folder, you can also share files through AudioCopy, Document Picker (iCloud, Dropbox etc. ) and AudioShare Samples manager can also read the Built-in files, but you cannot rename or delete them Touch on a file in the list to show the actions popup
Here it is possible to Load a file in one of two Samplers (i e Sampler Ch 1 and Sampler Ch 2), Open In contains all system actions over the file, according to file type For example you can send files as an e-mail, open file with a listed app etc.
fi You can rename files in the Documents Folder, if you omit the file extension then Samples Manager will fill the original audio file extension for you
N B Samples manager shows only audio files supported, the other files in the Documents folder will not be seen
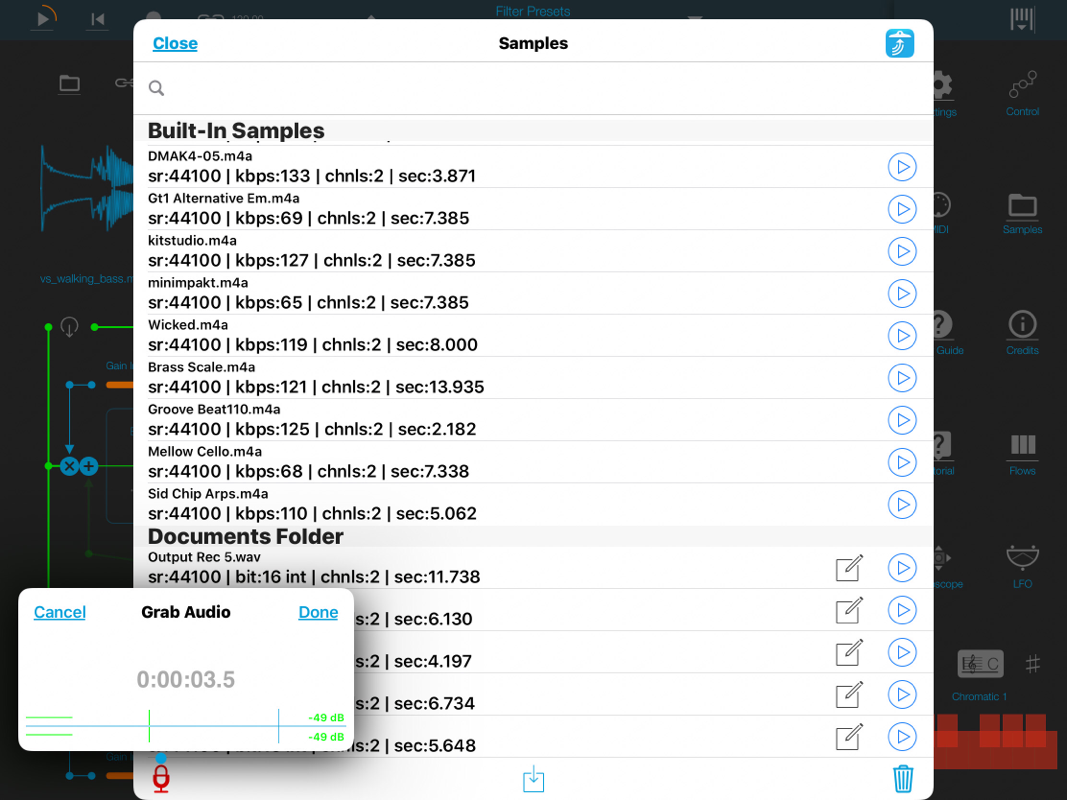
Audiobus or IAA, the Grab Audio will record always from iPad microphone/lines
Access to the iPod library, this allows the application to read user’s songs, audio books, and audio podcasts The file can be converted in .wav(PCM 16 bit 44 1 kHz) or .caf formats and stored in the local app Documents Folder If the file exist at path then progressive number will be attached to the file name
The document picker feature lets users select documents from outside your app’s sandbox These include documents stored in iCloud Drive and documents provided by a third-party extension Users can open these documents directly, editing them in place This access simplifies sharing documents between apps and easily enables more complex workflows
Use iTunes to share files between your computer and your device
1) Open iTunes on your Mac or PC
2) Connect your iPhone, iPad, or iPod touch to your computer using the USB cable that came with your device
3) Click your device in iTunes
4) In the left sidebar, click File Sharing
5) Select an app to see which files are available for sharing in that app on your device
You can pre-listen to the samples before you load them Q Starts audio capture from the microphone immediately and saves new stereo audio file in wav format 44 1 kHz, 16 bit in the Documents Folder Files
created are composed by id-name followed by a number, for example- lnput Rec 4 wav, Input Rec 5 wav etc.
Every new file will be numbered with the next consecutive number
N B You can record a mono or stereo file in wav format 16 bit 44 1 kHz
according to the iDevice channels Even if the Moebius is connected to
Plugins Support
Moebius can host up to 11 Nodes (i e RAU, Remote Audio Units), which can contain Audio Unit Extensions (AUv3) and Inter-App Audio elements (instruments, generators, effects and music effect) on iOS 9 and later
The Audio Unit Extension is a new audio Apple standard (more on it below)
Both types of plugins can receive the host transport state and a beat clock signal for sample accurate synchronization (provided the plugin implements
AUV3
Unlike the standard music apps, the AUv3 plugins can be launched multiple times This way you are able to create multitimbral instruments with the same synth plugin or use multiple instances of an effect plugin (filter, delay, etc) in multiple audio pipelines
The user interface of an Audio Unit Extensions appears directly inside the Moebius app in a floating resizable window (tap the node to bring up the plugin user interface)
The state of current Audio Unit Extension is saved with the Moebius presets and, of course, you can create multiple instances of the same AUv3 plugin
Inter-App Audio
An IAA (Inter-App Audio) node is actually a separate app, so when you tap the node inside Moebius, the display switches to the IAA app
The IAA Instruments and Music Effects can receive MIDI messages directly from Moebius‘ there’s no need to run a separate Virtual MIDI port
Note that the state of the IAA nodes is NOT saved with the Moebius presets
Please be aware that all RAU nodes (Instruments or Music Effects) receive MIDI from the same port and channels
The Presets
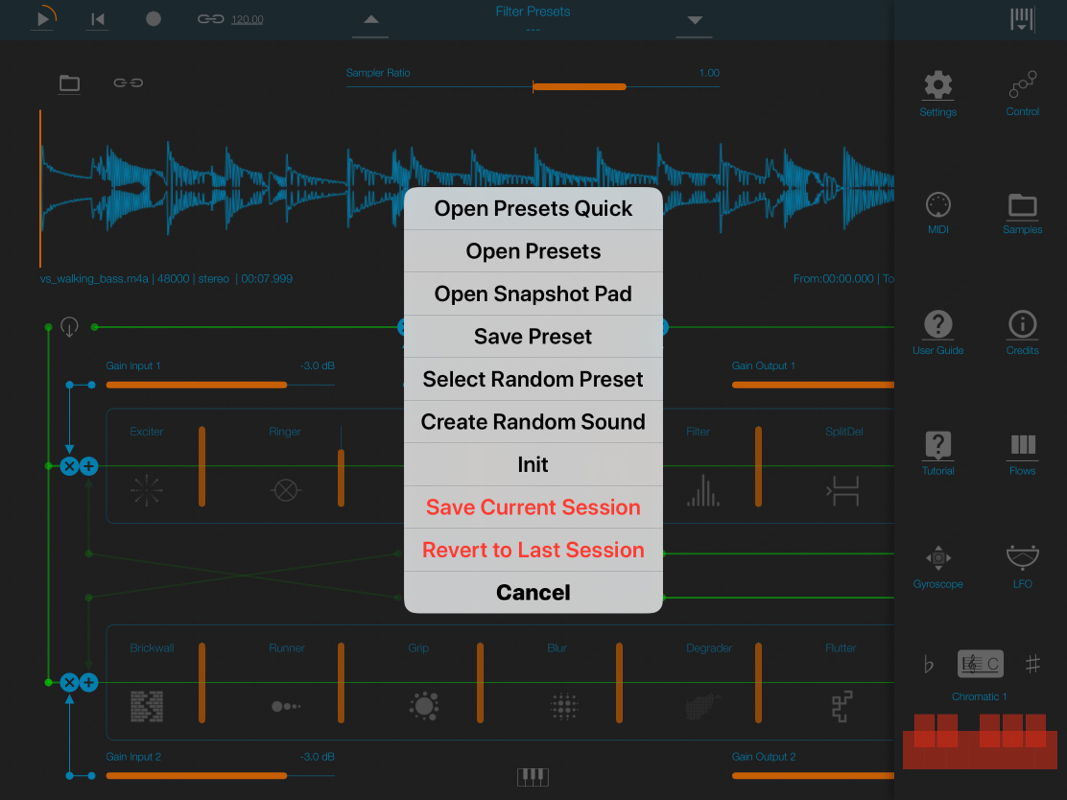
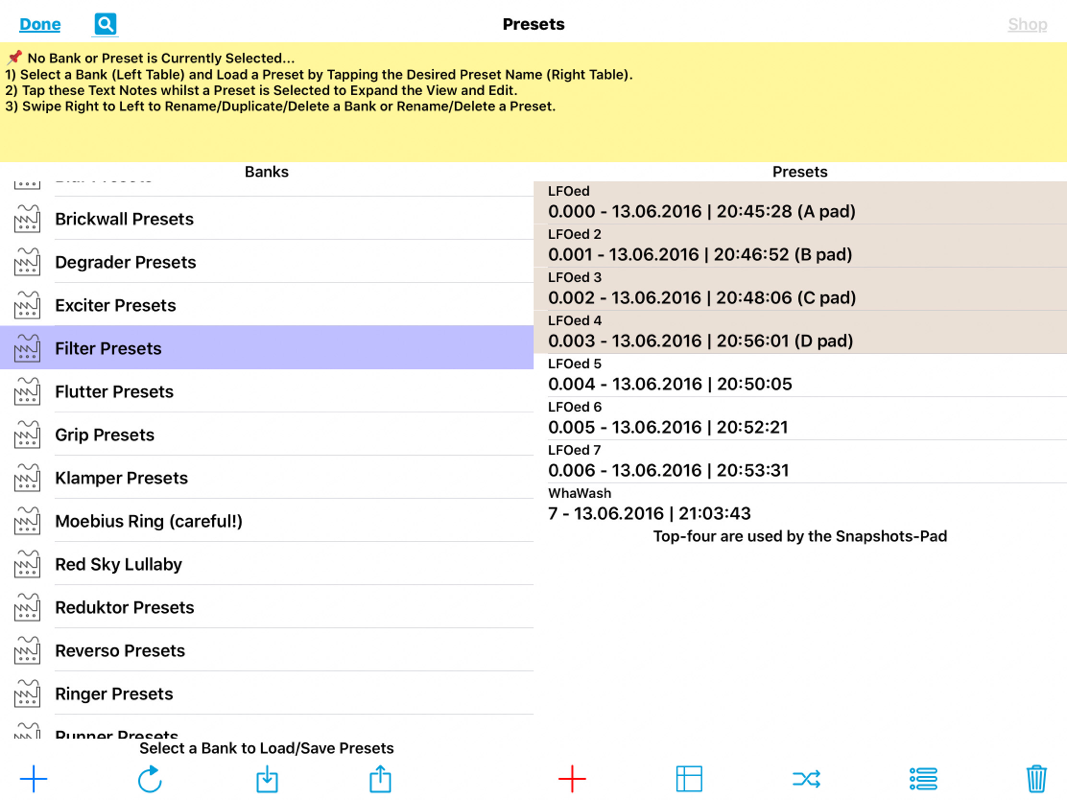
Open Presets: opens the Preset Manager (see below).
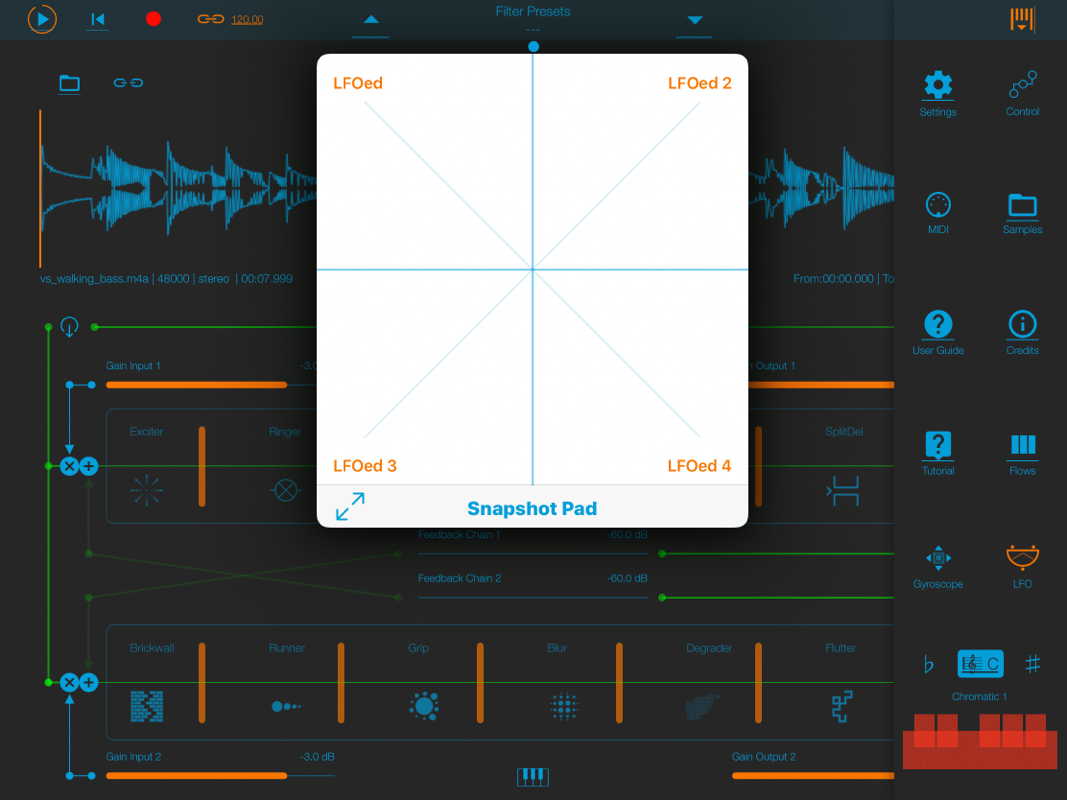
Open Snapshot Pad: opens the Snapshot Pad window (see below)
Save Preset: saves the current parameters configuration as in the current Bank
Save Preset As...: prompts for a new name for the preset and saves it
Overwrite Preset: ovenlvrites the last selected preset with the current parameters configuration
Select Random Preset: selects randomly one of the stored presets
lnit: recall the default value for all the parameters
Create Random Sound" opens a window where you can randomly alter the parameter values The central slider sets the percentage of each random variation, and you can decide whether to include the gain parameters or not with the switch labeled “Assignations” A tap on the crossed arrows icon generates a new random configuration The values can be higher or lower than the preceding values When the upper or lower limit of a parameter is reached the new values are folded in the opposite direction There are two additional icons, two zigzag arrows pointing upward or downward A tap on the downward arrow generates random values which are lower than the previous ones, a tap on the upward arrow generates random values which are higher than the previous ones When the upper or lower limit of a parameter is reached the new values are wrapped in the opposite limit The cun/ed arrow on the upper left is the global UNDO and resets the parameters to the values they had before the random window was opened
Cancel: closes the Preset Menu with no action
(Left column) Factory preset-banks (Excluded from iCloud back up)
.(Right column) Library preset-banks (if available as In-App Purchasing) (Excluded from iCloud back up)
User preset-banks (Included in iCloud back up) If you delete, overwrite, rename or save new presets in factory/library banks, the icon will change as User preset-banks , being backed up
Snapshot banks are located in Documents folder, you can access files via Tunes Sharing, see ‘Samples’
The Snapshots bank file is a kind of Property List format (.moebius), you can edit as text and modify the values just rename in .plist
Swipe (right to left) on a preset or bank to rename/duplicate/delete it
From the Left
Create new preset
You can add new files by copying in the app's documents (through
Import, Restore Factory bank and Documents Picker
Email, Open in and Document Picker
Save and Save in a Bank
Open the Snapshot pad
Load a preset, randomly from the banks list
Select a Preset to delete
Delete all Presets for a selected bank A warning message will be displayed
The Snapshot Pad
Hi The purpose of the unique Snapshot Pad is to obtain intermediate values between four snapshots (corners) You can change snapshots assigned in the corner through the Snapshots list (see above)
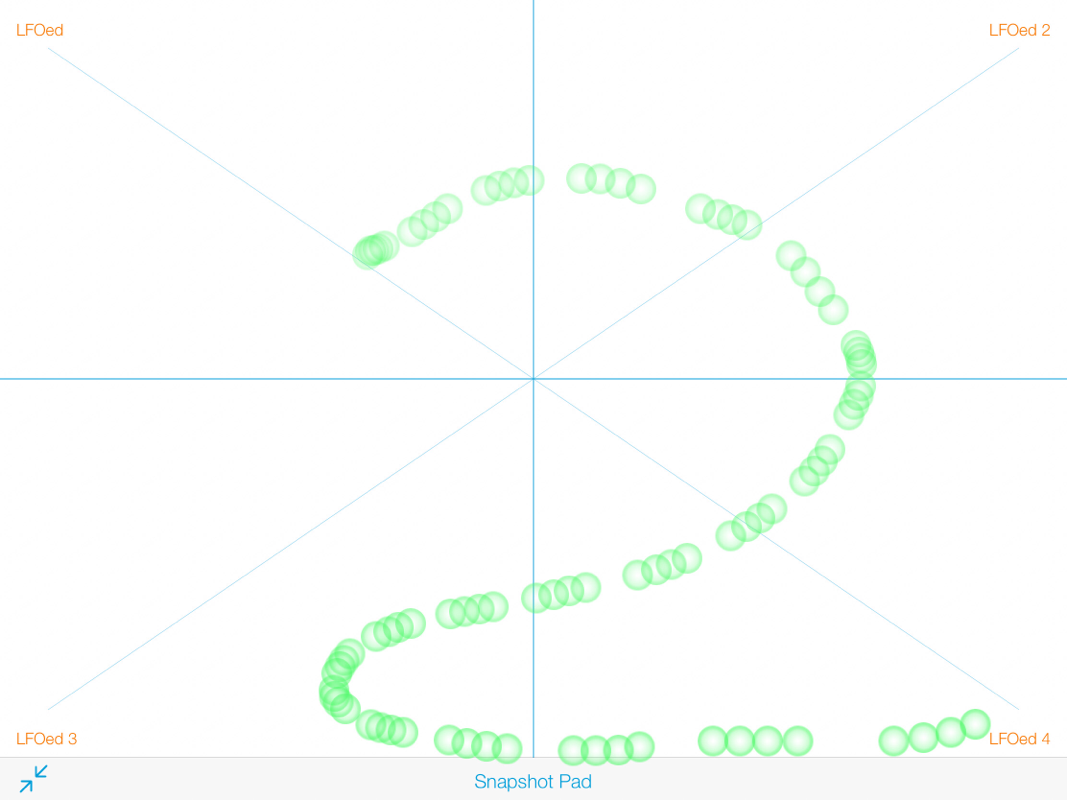
The Snapshots Pad performs complex interpolations between four snapshots on a tvvo-dimensional space By scrubbing your finger on the Snapshots Pad a temporary new snapshot will be created by mixing the four snapshots depending on distance Thus you can modify hundreds of parameters with a single touch, this is also called Hyper Vectorial Synthesis.
Snapshots Pad can be resized on fullscreen for detailed controls (left bottom icon)
N.B. Snapshot Pad have no effect on Switches and Sampler.
Settings
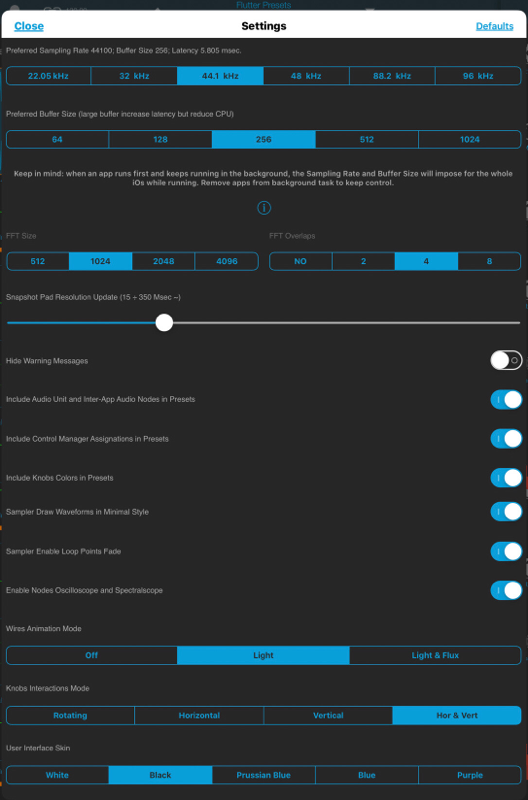
Buffer Size set the Audio Device latency When you run Moebius from
Audiobus, or Inter-App this value will be taken from Audiobus or Inter-App
Host Warningl When an app runs first and keeps running in the background,
the Sampling Rate and Buffer Size will impose for the whole iOS while running
FFT Size
This is the Fast Fourier Transform Size expressed in samples
It must be a power of 2 such as 512, 1024 or 2048 (to give a few commonly used values)
For example, if your FFT size is 2048 samples long, the FFT analysis gives you 1024 equally-spaced frequency bins from 0 Hz to Nyquist
FFT Overlaps
The basic algorithm is known as a Short Term Fourier Transform (STFT) which is a set of overlapping "windows" of input and output data This kind of setup is necessary to reduces unwanted modulation on input to the FFT and
allows us to modify the FFT data without unwanted overlap-add artefacts on output You can experiment with NO overlap in order to hear the windowing modulation between FFT frames A good value for Moebius is 2 (default)
Snapshot Pad Resolution Update sets the time inten/al for the interpolations, from about 15 to 350 milliseconds Short times for higher resolution but higher consumption of CPU
Sync
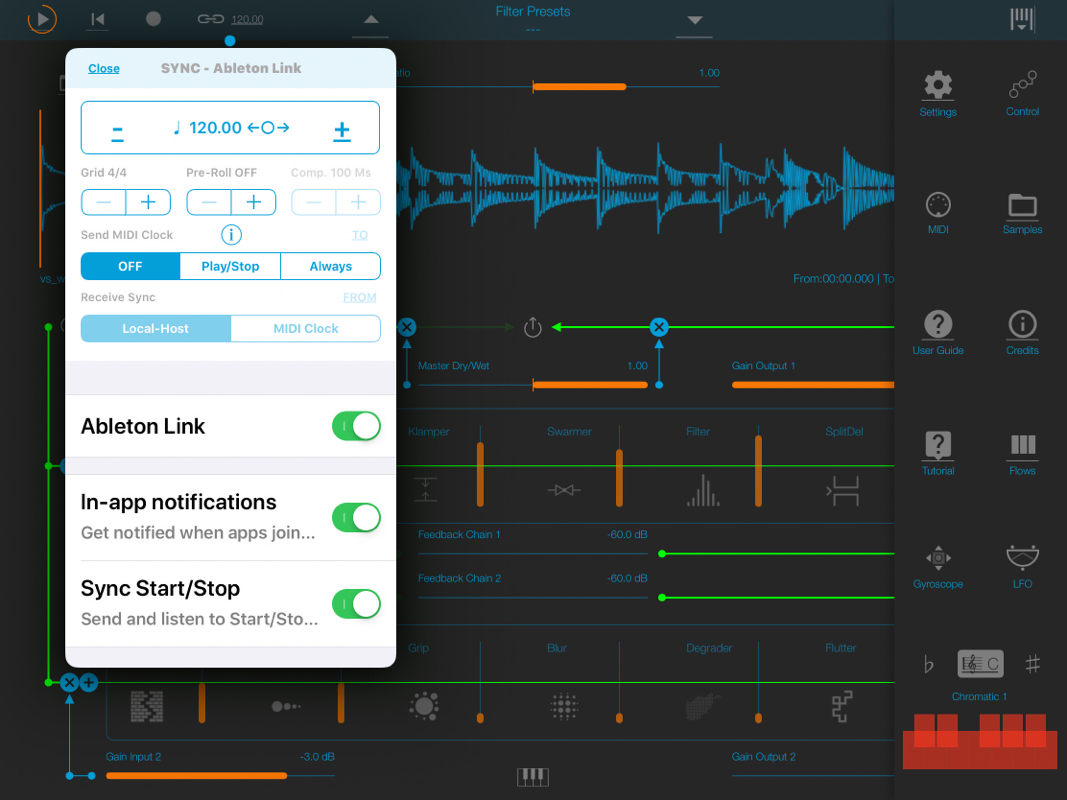
The goal of SYNC is to setup a global Metronome (MASTER BPM)
This will affect the LFO (Low Frequency Oscillator) and/or the Sampler (or Sequencer etc. ) when enabled to receive SYNC
You can sets the BPM (Beats Per Minute) by scrolling up/down (or left/right) the label value (J 120 <--o—>) or tap out the tempo
Single Tap or Long Tap the minus/plus buttons to increase or decrease by 0 25 By default 120 BPM corresponds to 1 Hz frequency for the LFOs
Ableton Link description
Ableton Link is a new technology that synchronizes the beat, phase and tempo of Ableton Live and Link-enabled iOS apps over a wireless network It lets you play devices together with the freedom of a live band Anyone can start and stop their part while others keep playing, and anyone can adjust the tempo and the rest will follow You can use Link to play with several copies of Ableton Live, with Live and iOS apps, or with iOS apps together — even
without Live in your setup
MIDI Clock description
The clock signal is broadcasted via MIDI to ensure that several MIDI-enabled devices such as a synthesizer or music sequencer stay in synchronization
The iOS implementation is designed to provides precise, jitter-free MIDI clock transmission and robust, error-tolerant MIDI clock reception
Quantization
When you are connected to an Ableton Live Session, the Play/Stop/Rewind
transport will wait until the next sync quantum boundary before starting
The ‘Sync’ button waits for the next beat (Tempo Forte) from the MIDI Clock
or Ableton Link and resets all phases for LFOs, Sequencer etc
Send MIDI Clock
Will create a virtual MIDI port for the MIDI Clock Output
In Play/Stop mode the MIDI Start/Stop Clock messages are sent according to Transport Play/Stop (Sampler, Sequencer etc. ) In ‘Always’ they will not be sent every time, but only at start
Please note when you are connected to Ableton Link, the incoming MIDI
Clock is disabled while you can send MIDI Clock out, converting the Ableton
Link to MIDI Clock
Receive Sync
1) Local-Host
2) MIDI Clock signal
3) Ableton Link
When the Ableton Link its enabled the Local-Host and MIDI Clock will be disabled and viceversa.
In Local-Host when the app is connected through Inter-App Audio, will receive the Sync from the HOST (if available, i.e. tempo/start/stop) and the current BPM is overridden.
When MIDI Clock is activated, you cannot change the BPM (Slave) since is controlled by the MIDI Clock (Master). Through the ‘CLOCK’ button you can select a MIDI Clock Source.
Others windows
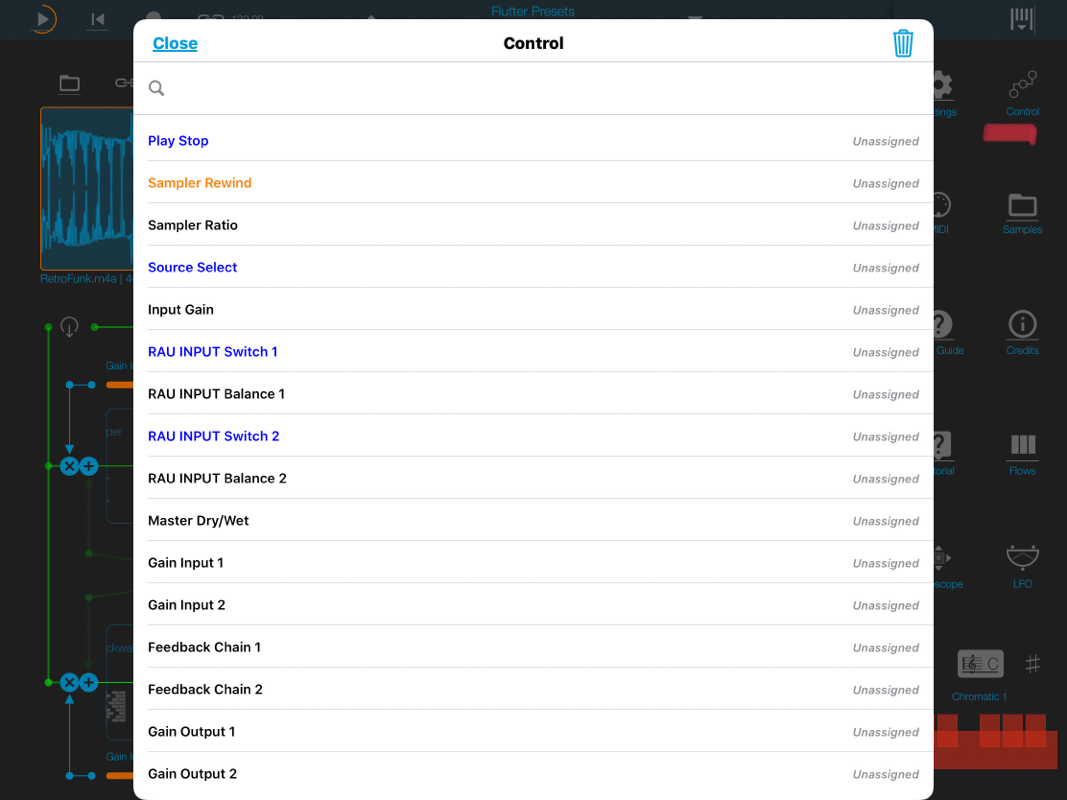
MIDI assignments
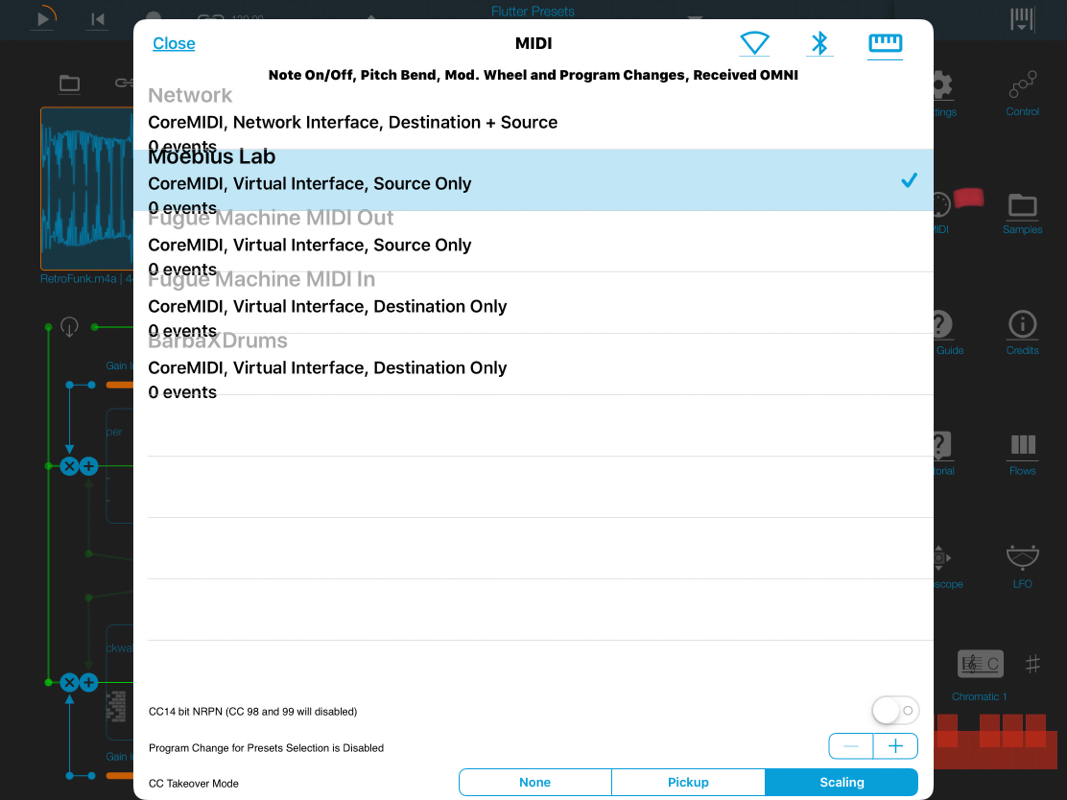
You can enable/disable the incoming MIDI signal from all the physical, virtual and network ports available The MIDI Clock is managed by SYNC, see the SYNC section for more details
If the Core MIDI Network is connected a wifi symbol will appear in the Network port cell
Channel sets the input channel for the selected port, the ape FiIter DK (Keyboard) will receive the Note On/Off messages in OMNI (from all 16 channels) or, one of the 16 channels
Configure Bluetooth LE MIDI
With the release of iOS 8 and OS X Yosemite, sending and receiving MIDI data is supported using Bluetooth Low Energy connections on any iOS device or Mac that has native Bluetooth Low Energy support All established
connections are secure which means that pairing is enforced and connections cannot be made to your devices without your explicit consent
After a connection is established, it simply appears as an ordinary MIDI device that any MIDI application can communicate with
UUVIDU ll ldl dl ly IVIILII QPPIIBQLIUI I bdl I bUl I ll I ILII llbdlfi VVILI I
Enable NRPN
NRPN stands for "Non-Registered Parameter Number" and is part of the MIDI
specification for the control of electronic musical instruments NRPNs allow
for manufacturer-specific or instrument-specific MIDI controllers that are not
part of the basic MIDI standard
Unlike other MIDI controllers (such as velocity, modulation, volume, etc),
NRPNs require more than one piece of controller data to be sent First, controller 99 - NRPN Most Significant Byte (MSB) - followed by 98 - NRPN
Least Significant Byte (LSB) sent as a pair specify the parameter to be changed Controller 6 then sets the value of the parameter in question
Controller 38 may optionally then be sent as a fine adjustment to the value set by controller 6
This fine adjustment is part of the conventional MIDI controller specification, where any of the first 32 controls can be optionally paired with a control offset 32 higher This is the rare 14-bit Continuous Controller feature of the MIDI
specification, and NRPNs simply take advantage of that existing option in the same way offering 16,384 possible values instead of only 128 (http //en wikipgdia Qrg/w|k|/NFIPN)
When you enable NRPN, you should not employ CC 99 and 98 as the normal CC in order to avoid an undesired overlap An NRPN message must be sent with this order‘ CC 99 98 6 38 where the first couple is the CC number and
the second couple is the data You can MIDI learn as for the normal CC, and NRPN works for all knobs and parameters Although an NRPN CC number can be greater than 127, you will not be able to learn CC beyond 127
Program Change for Presets Selection
You can select Presets (current selected bank) by remotely sending a MIDI Program Change You can select the MIDI channel where you can receive PC messages A PC value of zero will select the first preset in the list, a value of 1 for the second etc. The range is from O to 127
Accelerometer X and Y are used to control the parameters through the horizontal or vertical inclination of the device
LFO, Low Frequency Modulation is a table look-up oscillator with seven built- in shapes The frequency of LFO is expressed in Hz and BPM (Beats per Minute) You can get the period time by dividing 1/freq The LFO Frequency
value is converted in BPM (Beats Per Minute), you can adjust this value through the minus/plus buttons, these will replace current value with the integer BPM (previous/next) or you can TAP to set your own Tempo
¢ Will reset to zero the phase of current LFO Will reset to zero the phase of ALL LFO actives G =3
Enabling the Link symbol, you will disable the ‘Low Frequency Oscillator in Hz‘ Slider, so the value of the current LFO is sampled from the global
‘MASTER BPM’ You can adjust the BPM value from SYNC view When the MIDI Clock or Ableton Link is enabled (see MIDI Manager and SYNC) the BPM value will affect all LFO enabled for SYNC mode The goal of the ‘SYNC
Subdivision’ Slider is to rescale the ‘MASTER BPM’ from SYNC according to the relative symbol (abbreviate musical note time values)-
Normal ‘1/1,1/2,1/4,1/8,1/16,1/32, 1/64
Triplets ' 1/1T, 1/2T, 1/4T, 1/8T, 1/16T, 1/32T, 1/64T
Dotted ' 1/1 D, 1/2D, 1/4D, 1/8D, 1/16D, 1/32D, 1/64D
Where ‘D’ is a dotted note and ’T’ is triplet
With 1/4 (Default), the BPM follows the ‘SYNC BPM’ or ‘MIDI Clock’ BPM
when enabled, i e 120 BPM corresponds to 1 Hz
Where ‘D’ is a dotted note and ’T’ is triplet
With 1/4 (Default), the BPM follows the ‘SYNC BPM’ or ‘MIDI Clock’ BPM
when enabled, i e 120 BPM corresponds to 1 Hz
- 1/4 - each step is a quarter note (or BPM), e g 60 BPM is O 5 Hz
- 1/4D - each step is a dotted quarter note (or 1 5 x BPM),
- 1/4T - each step is a triplet quarter note (or 0 5/ 3) etc
J Reset default value (1/4 = 120 BPM)

